Hi welcome to Artinfoland platform
Artinfoland is an artist-run platform that connects organizations with global artists by allowing you to publish open calls for exhibitions, residencies, grants, and more.
To publish opportunities on Artinfoland as an organization, you need to register an Organizer account, complete your organization profile, and await confirmation from the Artinfoland team. Once confirmed, you can create and submit open calls directly through your dashboard.
Step 1: Register for an Account
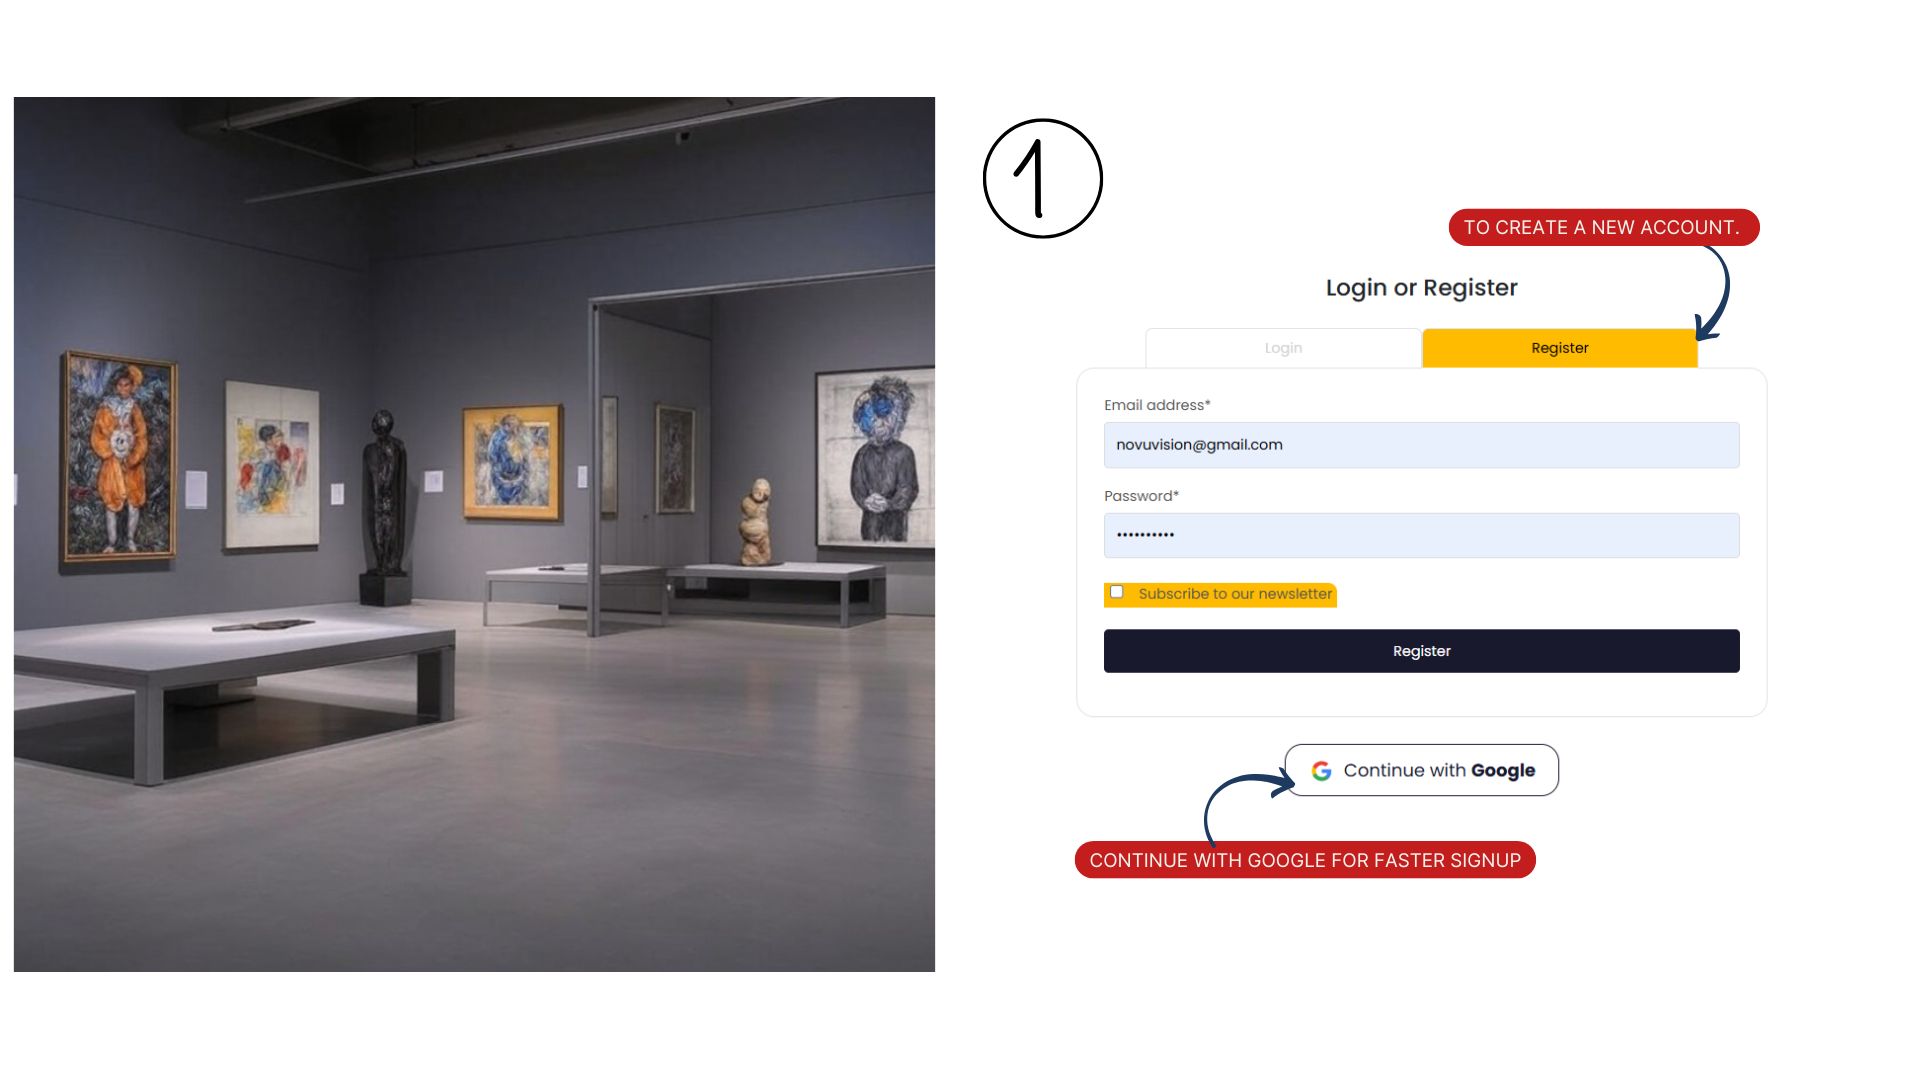
Visit My account – artinfo to create a new account. Fill in your email address and password, and optionally subscribe to the newsletter for updates. You can also continue with Google for faster signup. After submitting, you’ll receive a verification email.
Membership is free for basic access, but publisher accounts for organizations are also free and offer additional features like a profile in the organizations directory (if available).
Step 2: Verify Your Email
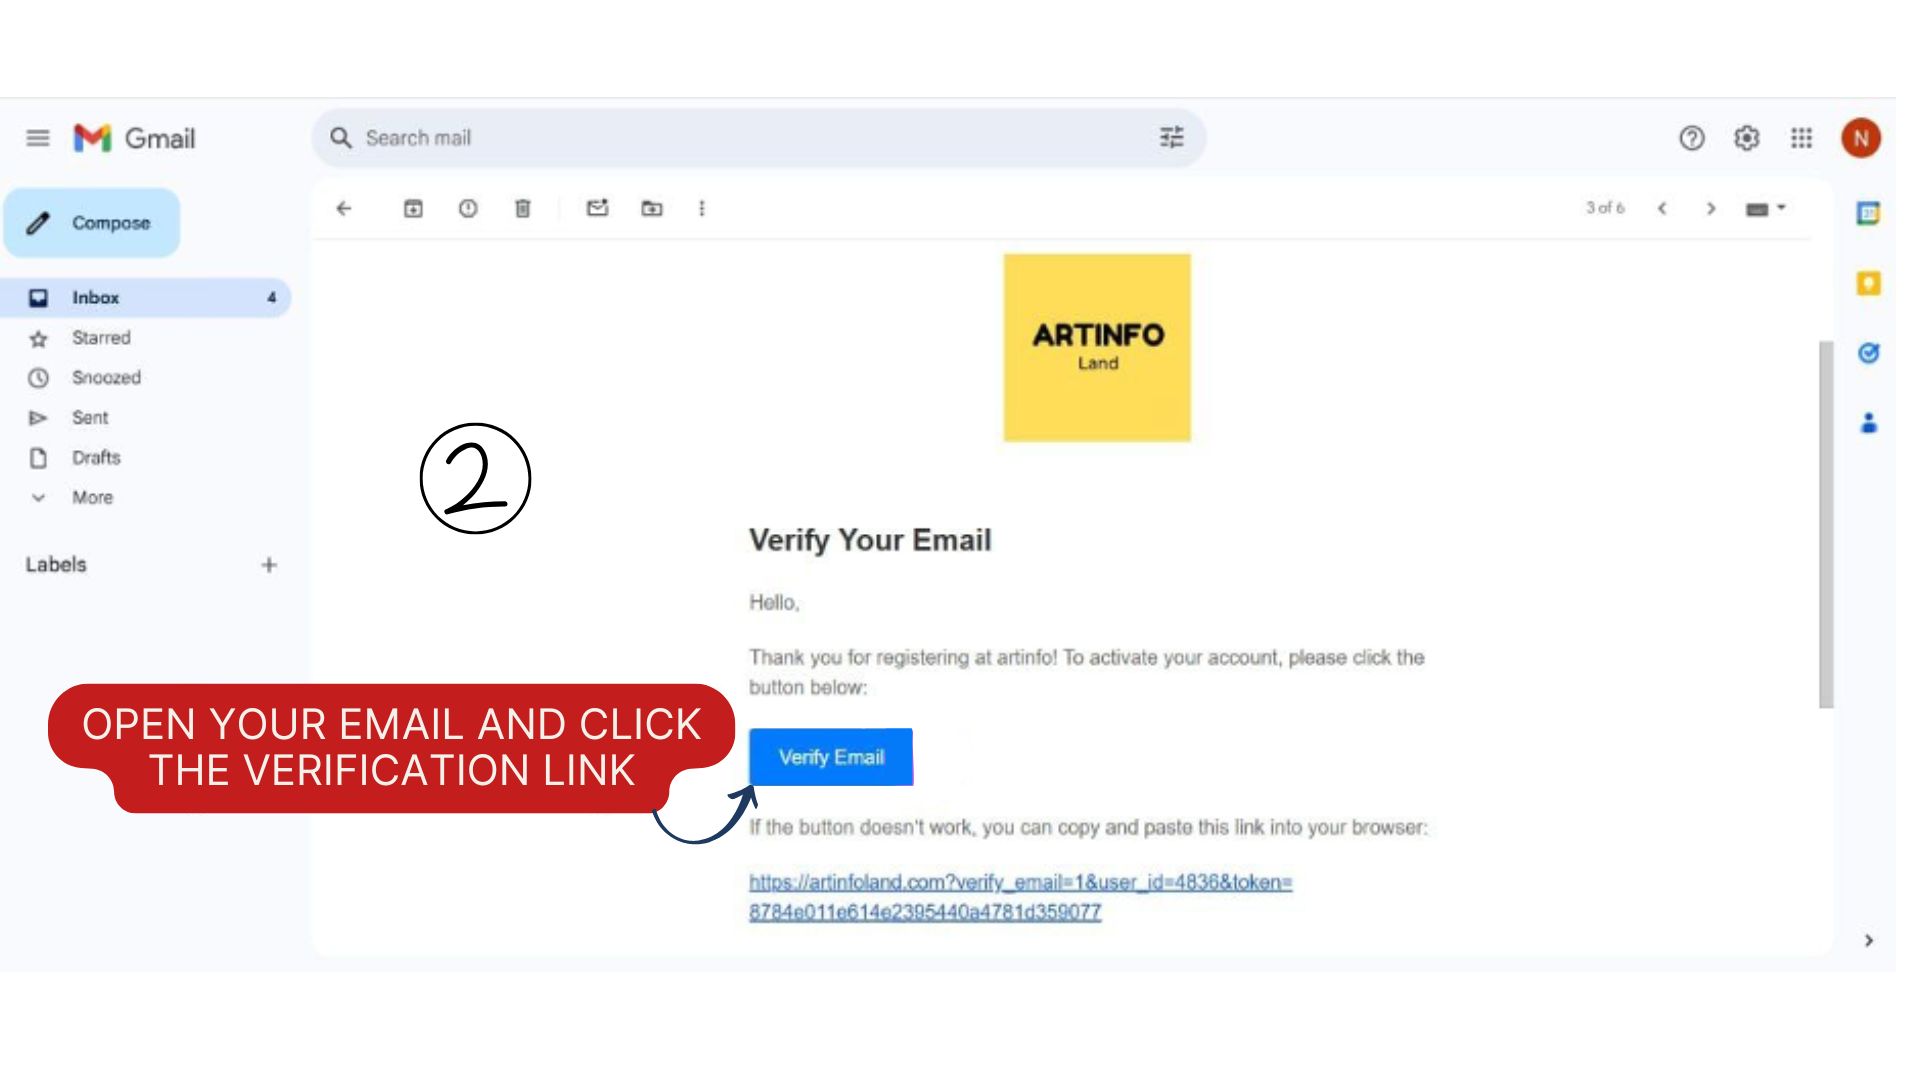
Check your inbox for an email from Artinfoland titled “Verify Your Email.” Click the “Verify Email” button or copy-paste the provided link into your browser to activate your account. This step is required to log in and access publisher features.
If you don’t see the email, check your spam folder or request a resend via the website.
Step 3: Sign Up and Choose “Organizer”
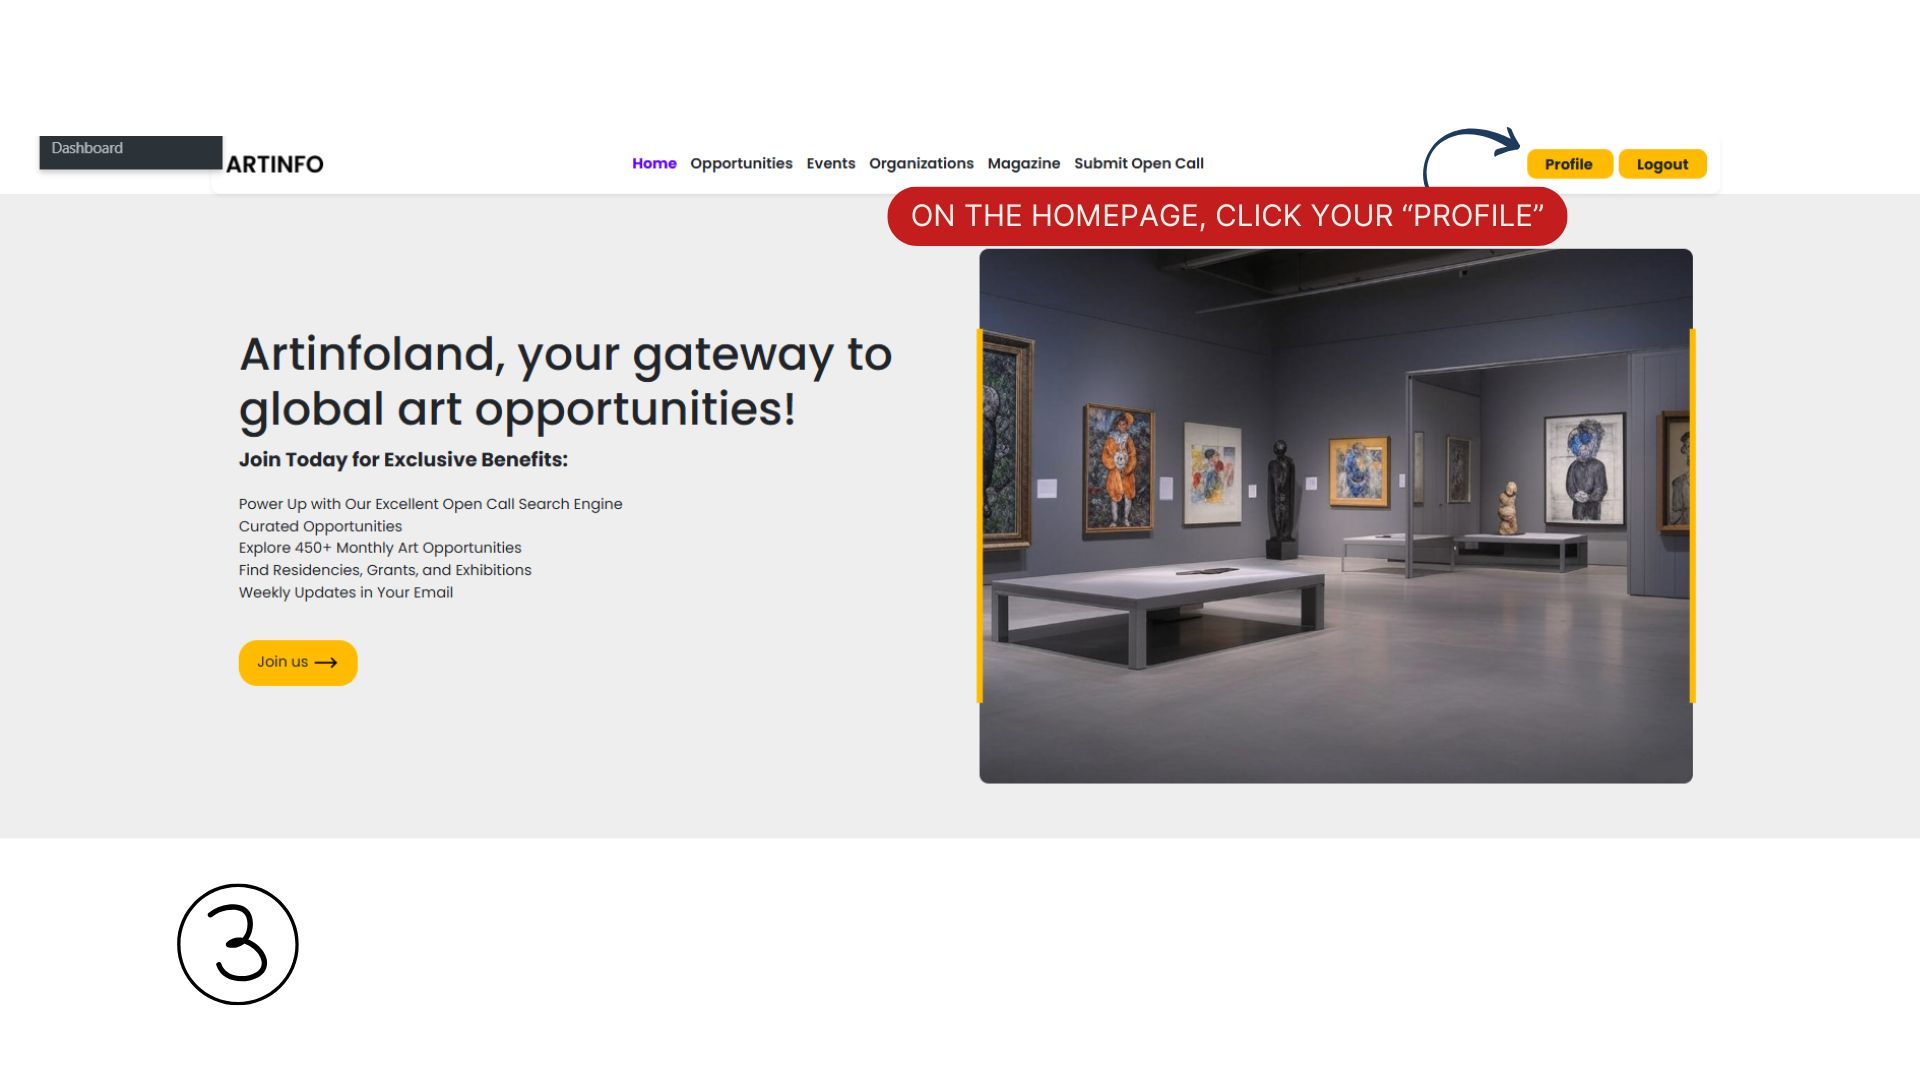
Visit artinfoland.com and click Sign Up in the top right corner. Fill in your email address and password, then click Register. You can also use Continue with Google for faster signup.
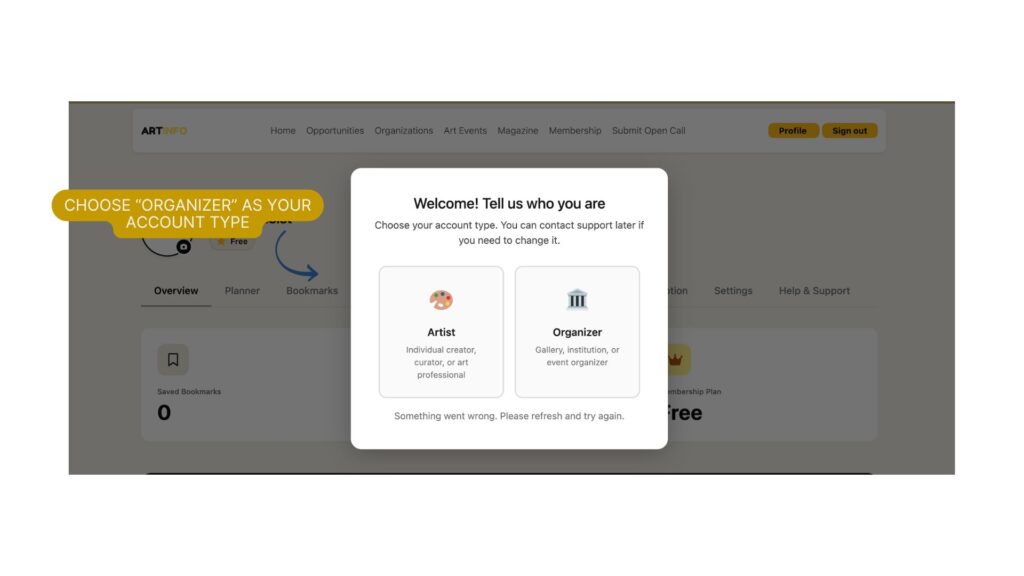
After verifying your email, you will be prompted with a welcome popup: “Welcome! Tell us who you are.” Select Organizer to proceed as a publisher.
If you need to change your account type later, contact Artinfoland support.
Step 4: Complete Your Organization Profile
After selecting Organizer, you will land on the Edit Identity tab of your organization dashboard. This is where you set up your public profile. Fill in the following:
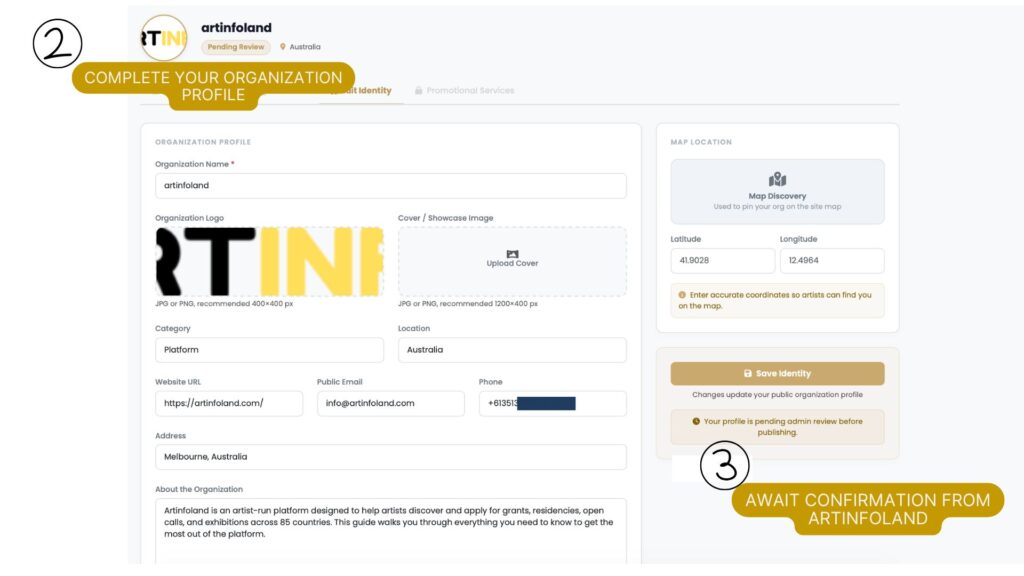
Organization Profile:
- Organization Name — your organization’s full name
- Organization Description — Write 2 or 3 paragraphs about your organization
- Organization Logo — JPG or PNG, recommended 400×400 px (max 1MB).
- Cover / Showcase Image — JPG or PNG, recommended 1200×400 px (max 1MB)
- Category — select the type that best describes your organization
- Location — select your country
- Website URL
- Public Email
- Phone
- Address — street, city, country
Map Location:
- Latitude and Longitude — enter accurate coordinates so artists can find you on the site map
Once complete, click Save Identity. Your profile status will show as Draft until it is reviewed by Artinfoland.
Step 5: Await Confirmation from Artinfoland
After saving your identity, your organization profile will show a Pending Review status. The Artinfoland team will review your submission and get in touch within a few business days.
Once approved, your profile status will change to Published and you will gain full access to your dashboard, including the Manage Content and Promotional Services tabs.
Step 6: Add a New Open Call
After your profile is published, go to the Manage Content tab. Click the + Add New button in the top right corner.
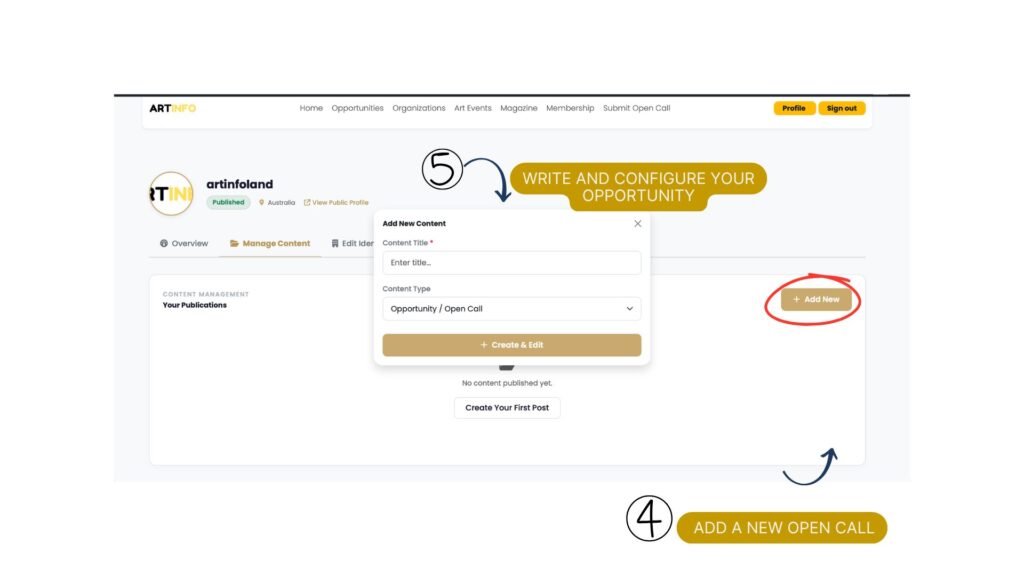
An “Add New Content” popup will appear. Fill in:
- Content Title — the name of your open call
- Content Type — select Opportunity / Open Call from the dropdown
Click + Create & Edit to open the opportunity editor.
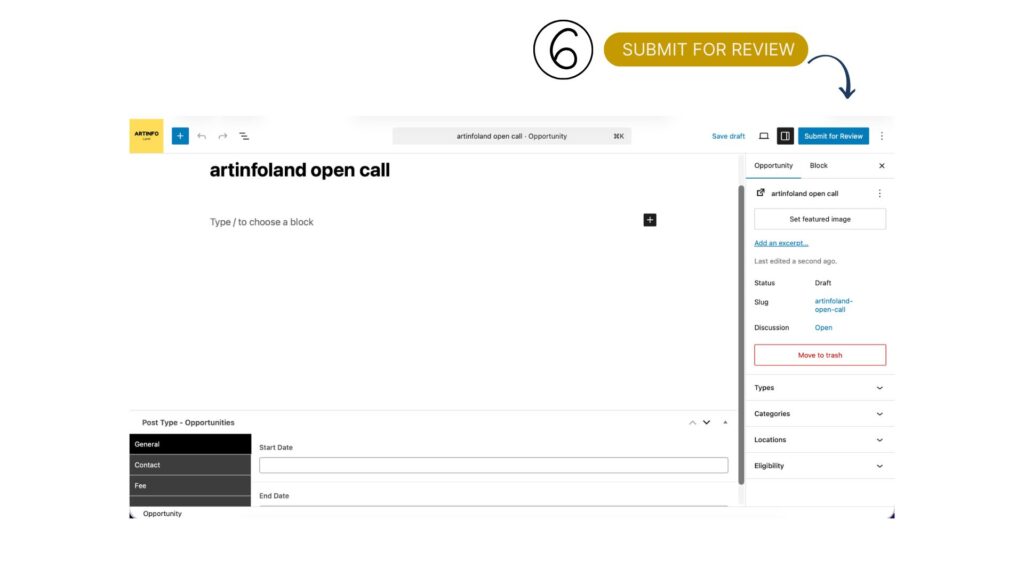
Step 7: Write and Configure Your Opportunity
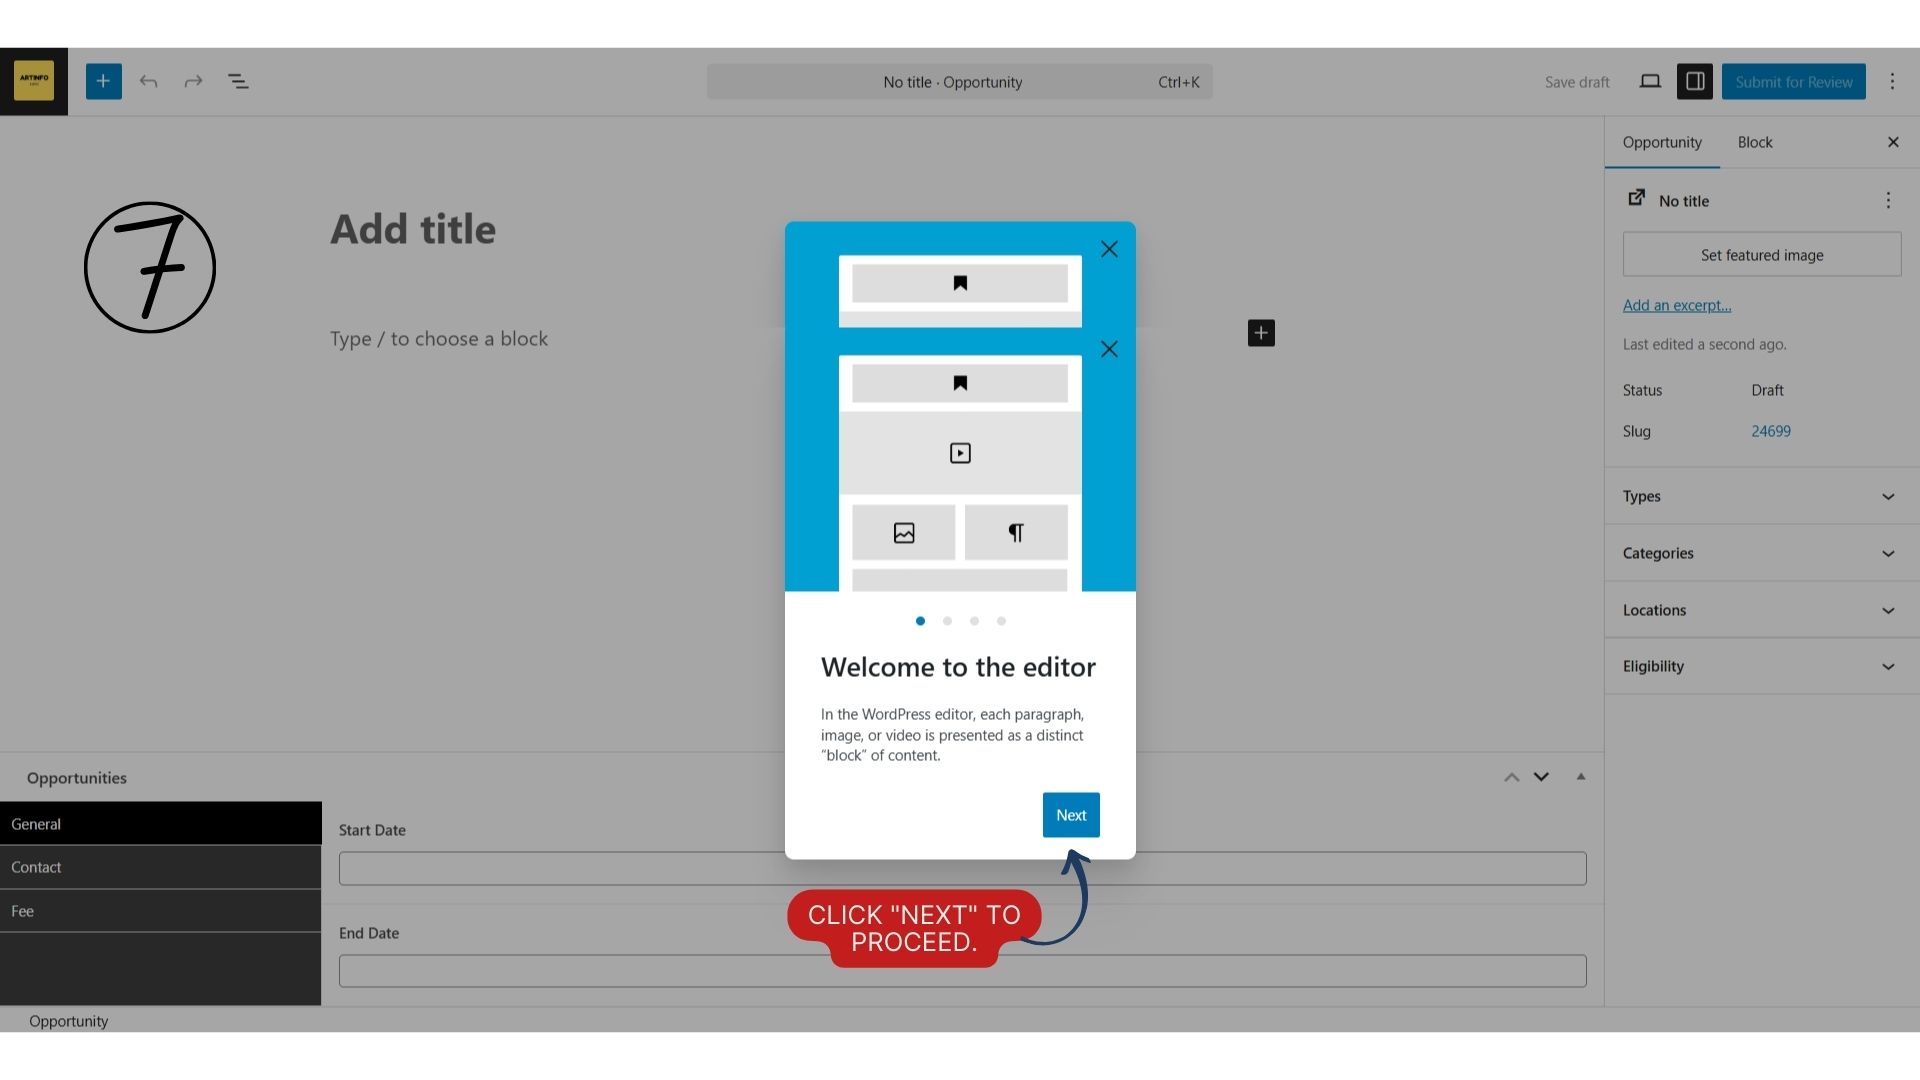
You will be taken to the opportunity editor, which uses a block-based editor. Add your title at the top and use the + button to add content blocks such as paragraphs, images, or videos.
Include a comprehensive description covering:
- Organizer background
- Purpose and theme of the opportunity
- Category / discipline (e.g. Visual Art, Photography, Performance)
- Eligibility (e.g. International, Emerging Artists, LGBTQ+ Artists)
- Location (city/country or Online)
- Key dates: submission deadline, announcement, event dates
- Application fee and payment details
- Awards and benefits (e.g. cash prizes, residency, exhibition)
- Contact information: website, email, social media
- Additional details: submission format, jury process, travel requirements
In the right sidebar, configure the opportunity settings:
- Types — select the relevant type (e.g. Award/Prize, Residency, Open Call)
- Categories, Locations, and Eligibility — select from the dropdowns
In the Post Type – Opportunities panel at the bottom, fill in:
- General tab — Start Date and End Date
- Contact tab — address, postcode, phone, email
- Fee tab — entry fee, participation fee, currency
You’ll be taken to the opportunity editor, which uses a WordPress-like block editor. Start by adding a title in the “Add title” field. Use the “+” button to add blocks for content, such as paragraphs, images, or videos. A welcome popup may appear explaining that each paragraph, image, or video is a distinct “block” of content—click “Next” to proceed.
In the editor, include a comprehensive description following these guidelines:
- Organizer Information: A brief background about the hosting organization.
- Title & Description: A clear and concise summary of the opportunity (e.g., purpose, theme, what artists will create or experience).
- Category: Specify the medium or discipline (e.g., Visual Art, Performance, Photography, Textile Art).
- Eligibility: Who can apply? (e.g., International, National, Female Artists, LGBTQ+ Artists, Emerging Artists).
- Location: Where the opportunity will take place (e.g., city/country or “Online”).
- Key Dates: Submission deadline and other timelines (e.g., announcement, event dates).
- Application Fee: Any entry costs and payment details.
- Awards & Benefits: What artists gain (e.g., cash prizes, exhibitions, residencies, mentorship).
- Contact Information: Website, email, social media.
- Additional Details: Submission format, jury process, travel requirements.
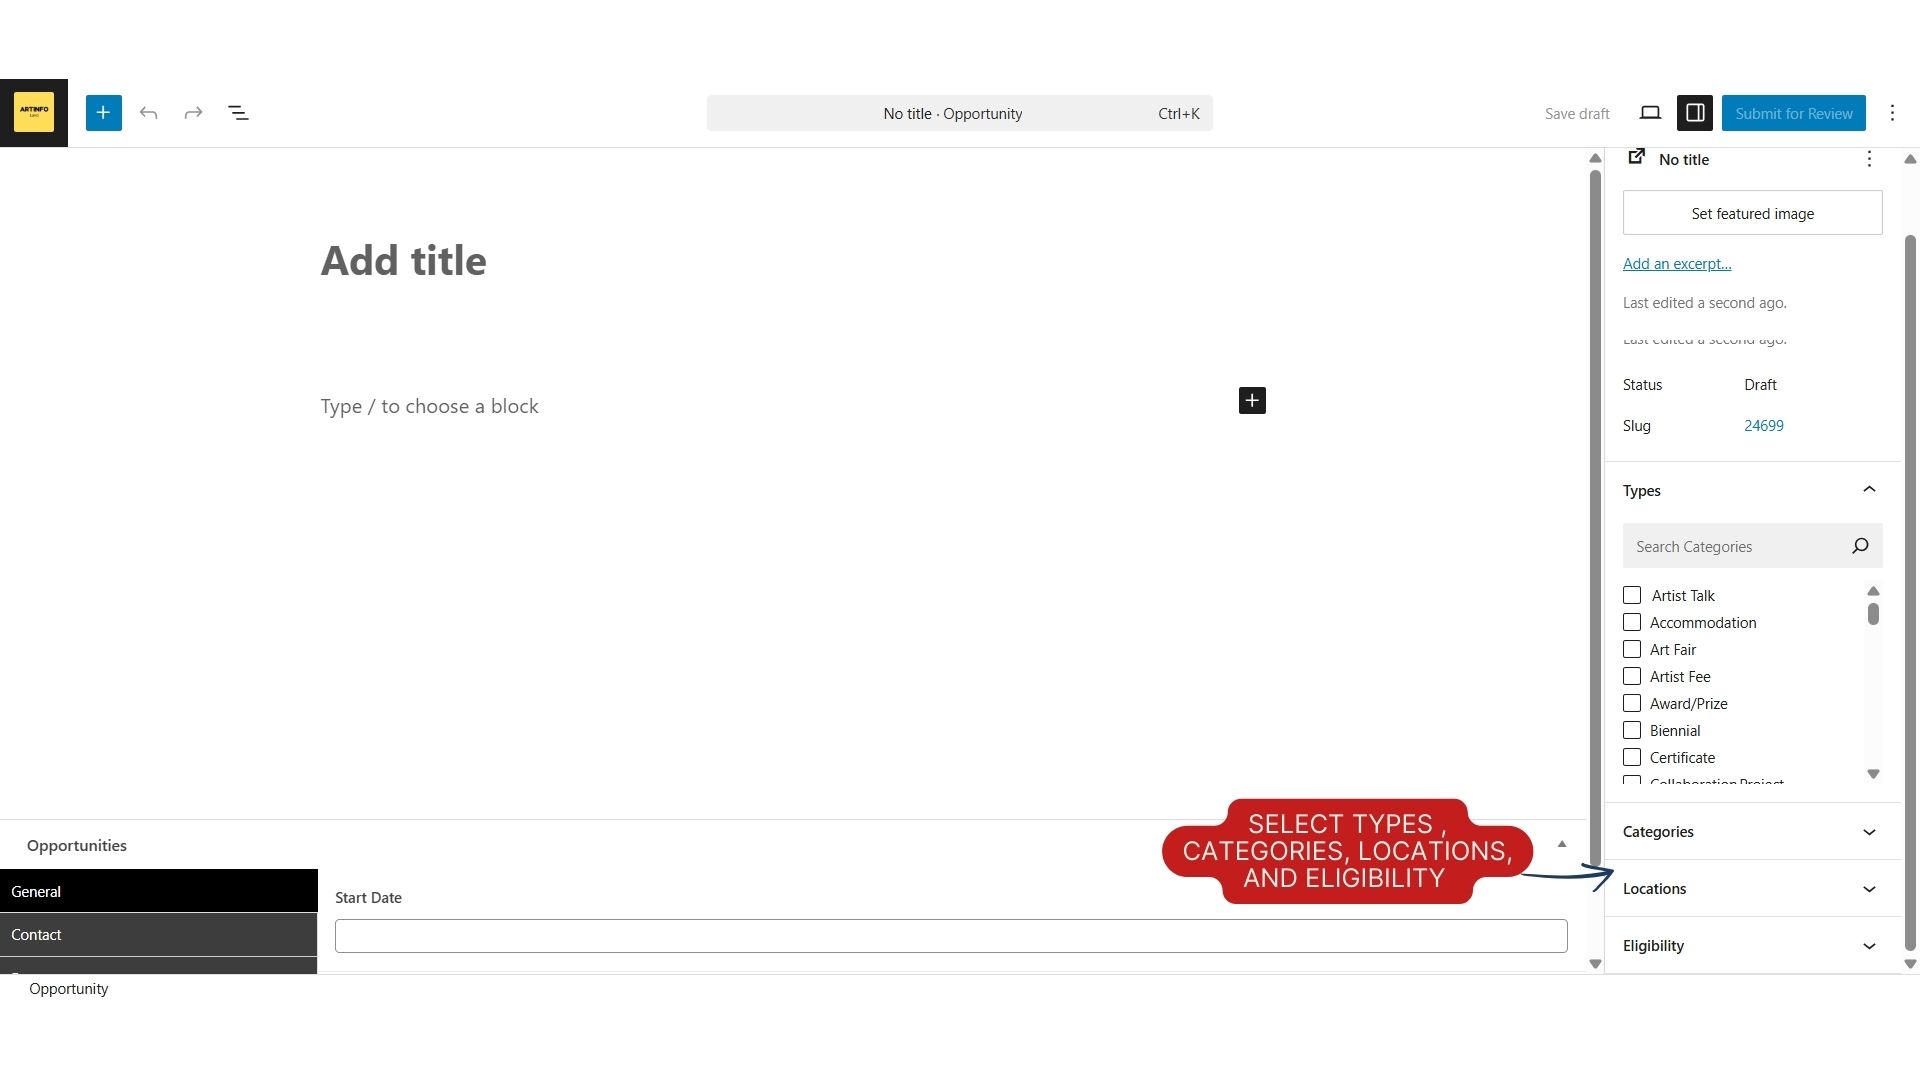
On the right sidebar, under “Opportunity”:
- Select Types (e.g., Artist Talk, Accommodation, Art Fair, Artist Fee, Award/Prize, Biennial, Certificate).
- Choose Categories, Locations, and Eligibility from dropdowns.
Under “Opportunities” tabs:
- General: Start Date and End Date (use the calendar picker).
Choose Organization page to Show your open call in your page
Contact: Address, Postcode, Phone Number, Email.
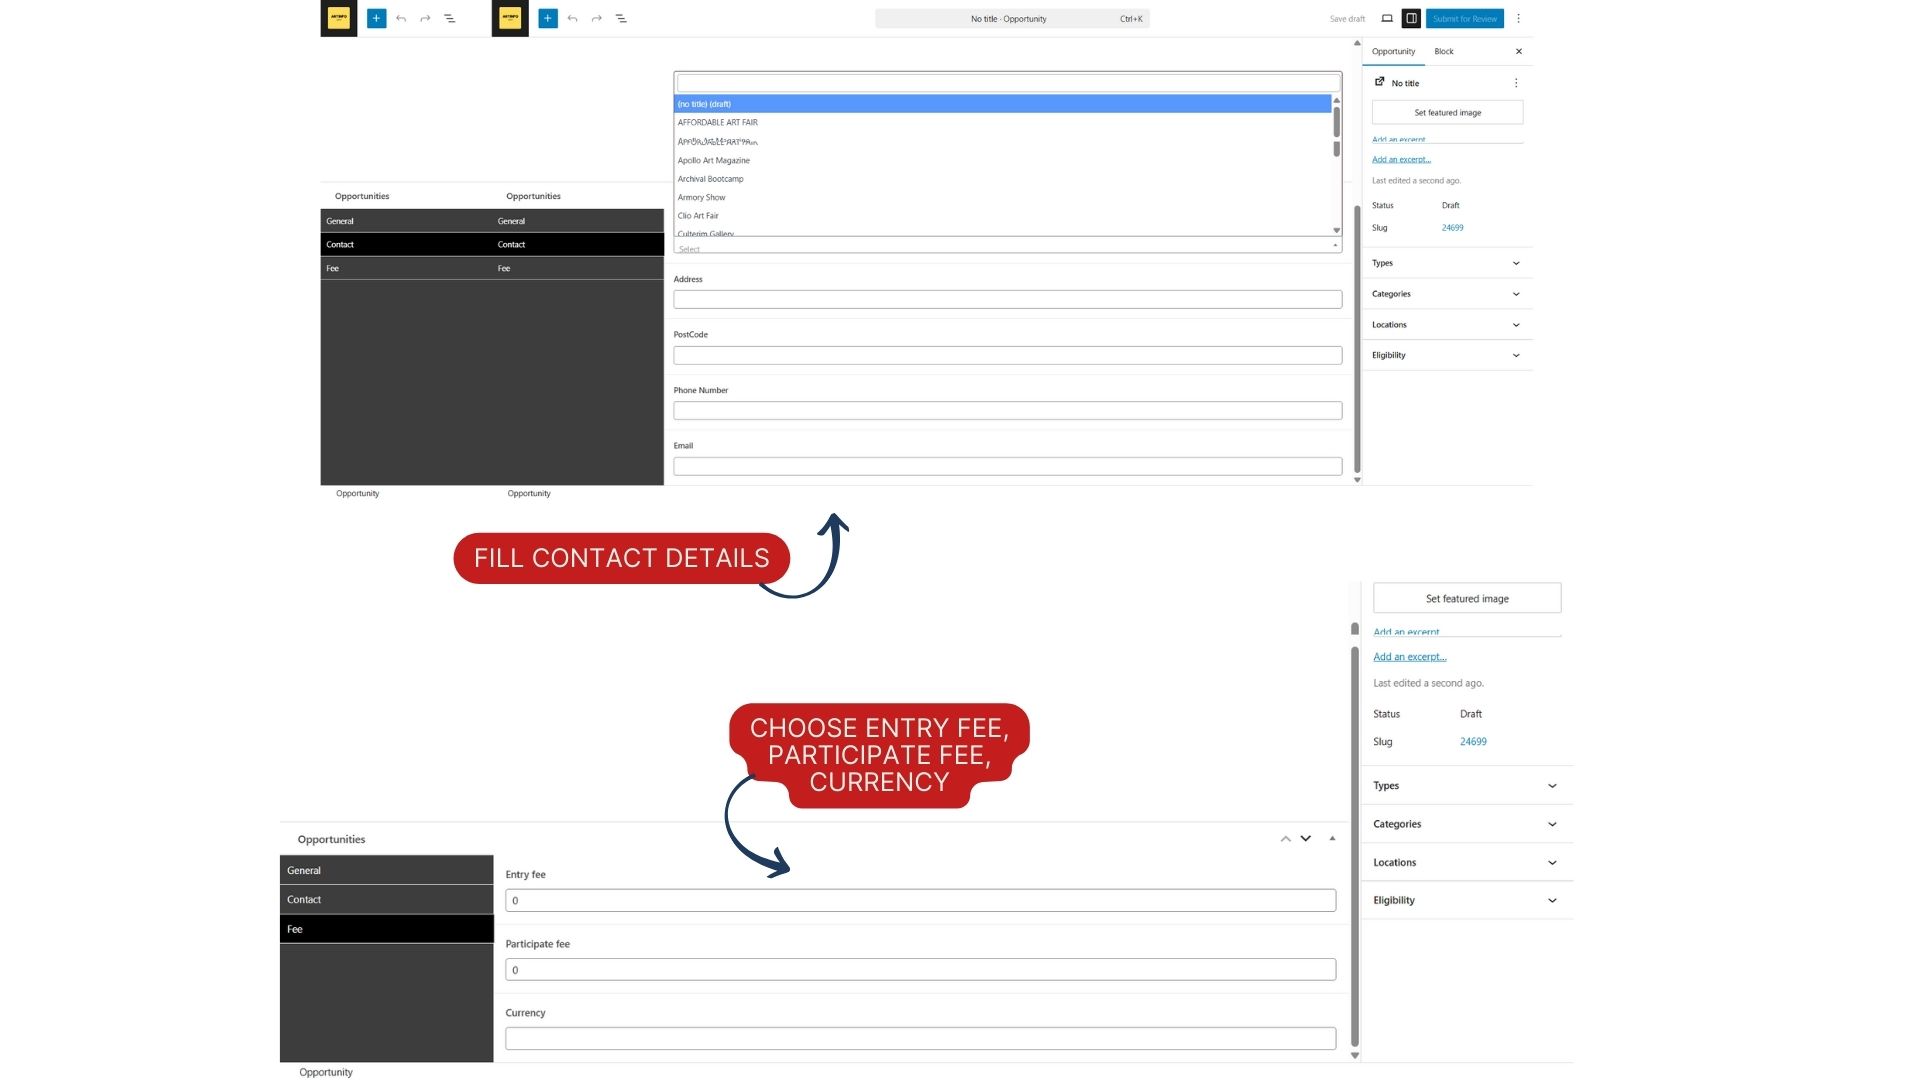
Fee: Entry Fee, Participate Fee, Currency.
Click Save Draft periodically to avoid losing your work.
Step 8: Submit for Review
Once your opportunity is complete, click Submit for Review in the top right corner of the editor. The status will change to Pending.
Artinfoland will review the submission for quality, transparency, and ethical standards before publishing. Expect confirmation within 3–5 business days.
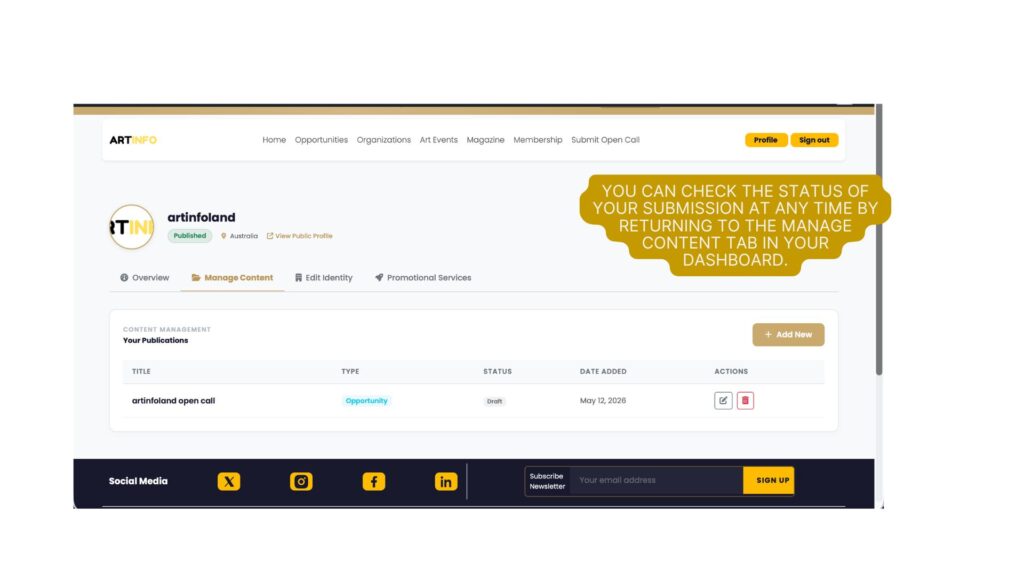
You can check the status of your submission at any time by returning to the Manage Content tab in your dashboard. Once approved, the status will change to Published and your open call will be visible to artists across 85 countries.
Alternative: Email Submission
If you prefer to submit your open call via email, send the details listed in Step 5 to collab@artinfoland.com with the subject line:
“Open Call Submission – [Your Opportunity Name]”
Tips for Organizations
- Complete your organization profile fully before submitting — a detailed profile speeds up the approval process
- Use high-quality images for your logo and cover, and enter accurate map coordinates for better visibility in the organizations directory
- Include all key details in your opportunity description: objectives, eligibility, dates, fees, and awards
- For any questions, email collab@artinfoland.com At the end click the buttom of Submite